Tutorial • Essie Nail Polish Favors

Sooo you know those peoples who get like 50-100+ likes on a status update or Instagram and your thought process goes one of two ways. Either you're like, "Psh, i got more than that on my last post," in which case, you can just skip all this because you won't possibly understand and decide I'm pathetic. Or, you're like me, and your baffled. You ask yourself, "But how?! Seriously, how? How many followers do they have? How did they get so many? Do people think I'm lame?" I'm excited if the little number switches to showing names to showing how many likes it has. Ah the little things in life. 

Those thoughts are true, but I promise I don't have a deep insecurity via social media or anything. When it really comes down to it, you post something because it captures a moment. And even though we post to share those moments, I believe they are just as much for ourselves. It's fun to look back through your feeds and remember little everyday snippets. 
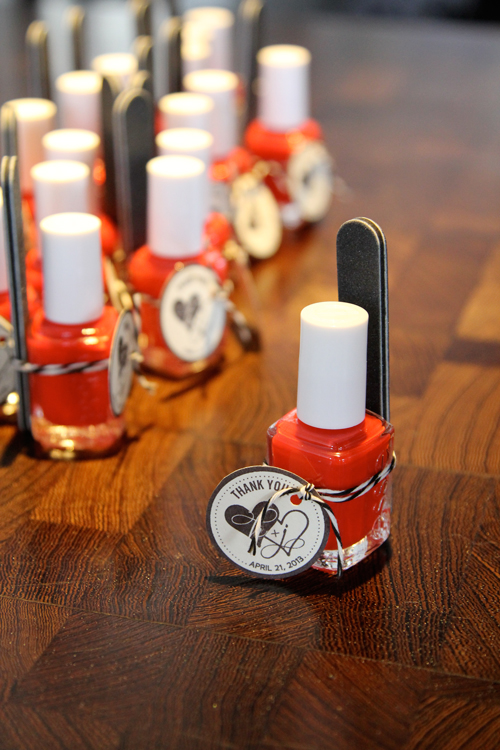
EssieFavor.jpg

I say all this to prove how astonishing it was to get almost 5,000 re-pins on one of my photos (shown above). And, I understand that 5,000 is barely a ripple in the massive sea known as Pinterest, but it was exciting nonetheless. I created something that others were interested in and appreciated. So, in honor of that, I recreated a short tutorial here in case anyone wants to try it out! It's super easy and it's a favor that guests will actually be excited about and want to take home and use. 

I suggest buying the nail polish and nail files on Amazon. Much cheaper. And if you want me to update these cute tags with your own initials and date, contact me! These tags are actually part of a complete bridal shower set including the main invite, advice for the bride cards, bridal trivia card, thank you card, and of course, the thank you tags. The set is customizable -  if you need them in navy, pink, or another color to match your shower, I would be happy to update them for you! Check out my shop if you're interested!
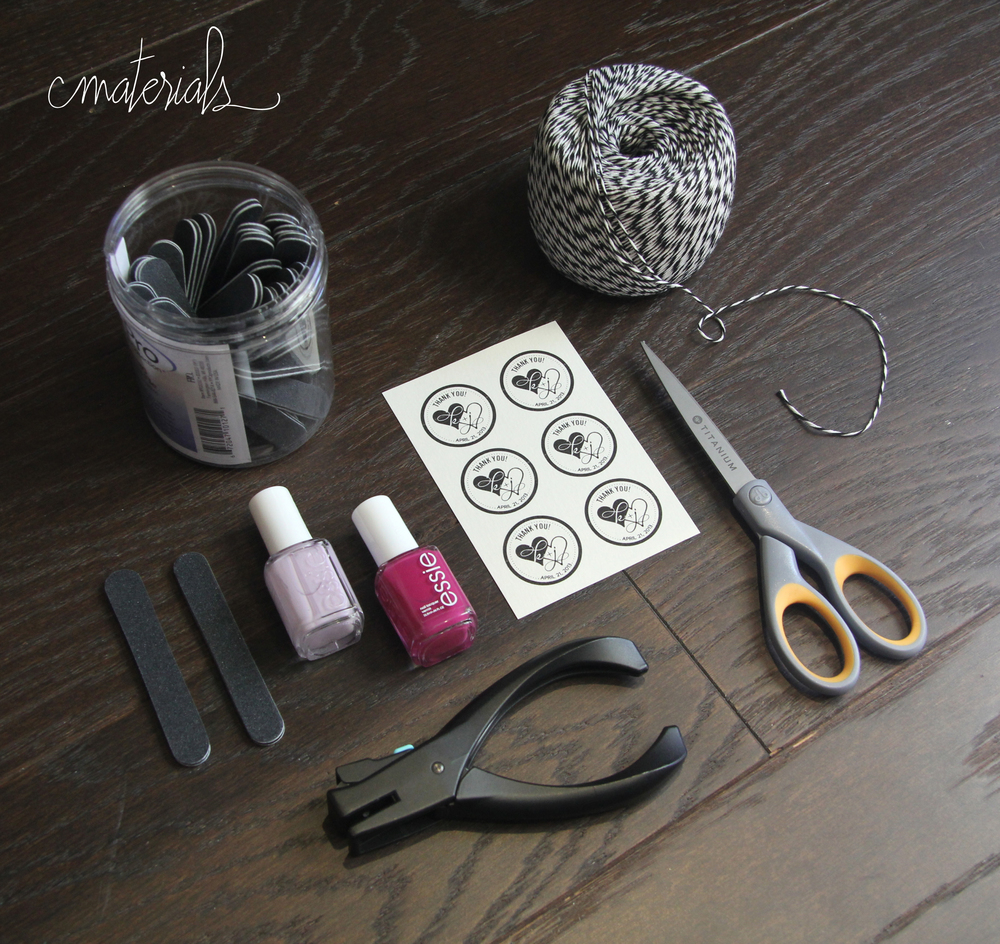
Nail Polish Favors - Materials.jpg
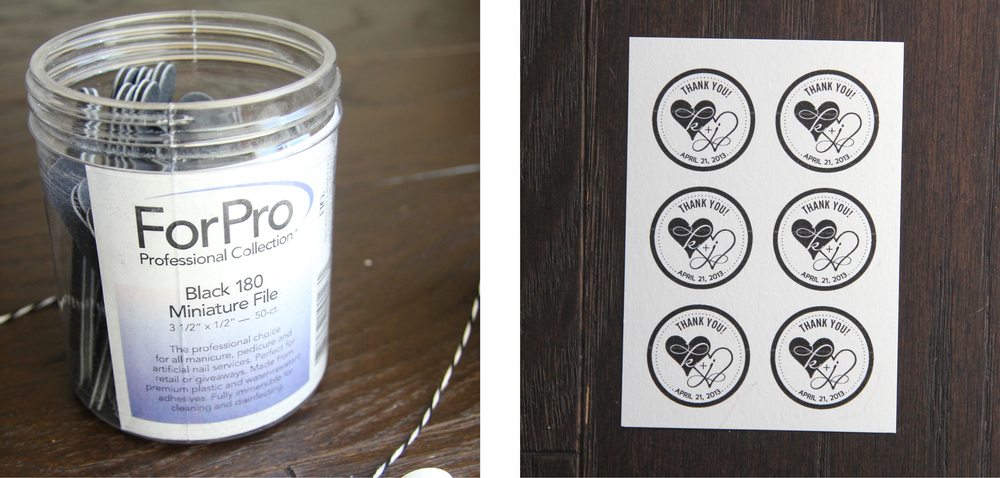
These are the mini emory boards I used and the thank you tags are designed by me!

These are the mini emory boards I used and the thank you tags are designed by me!

So, let's get started!

Things you need: 

Nail Polish
Emory Boards - I found these on Amazon and I think they are pretty much the same as the ones we found at a local beauty shop
Twine
Thank You tags
Mini Hole Punch
Scissors

Step One: 
Cut out the tags. I like to cut them out in squares and then carefully cut out the circle. 

Step Two: 
Punch a small hole to the side so it doesn't cut into the main design. 
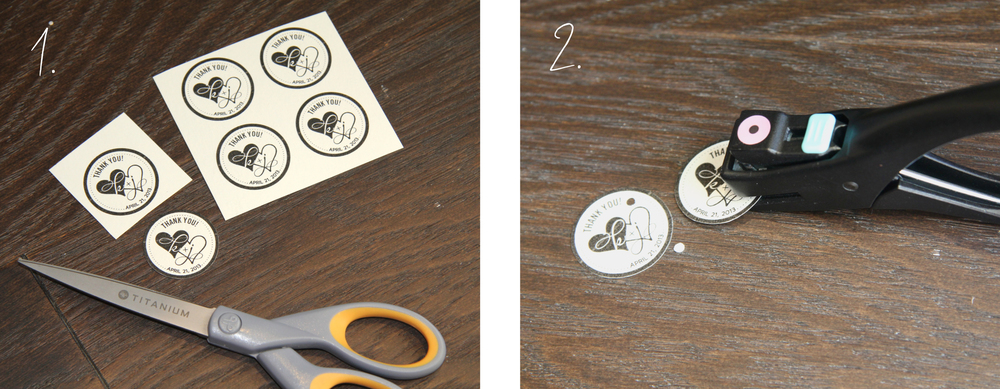
Nail Polish Favors - Steps 1-2.jpg

Step Three: 
Cut your twine. I suggest cutting each piece about 12 inches long. 

Step Four: 
Layout your twine and place the emory board in the center, and then place the nail polish on top. Wrap the twine around the nail polish and emory board twice and tie a knot at the front. If you're having trouble keeping the polish and board together, a piece of double sided tape can help keep them together as you tie. 
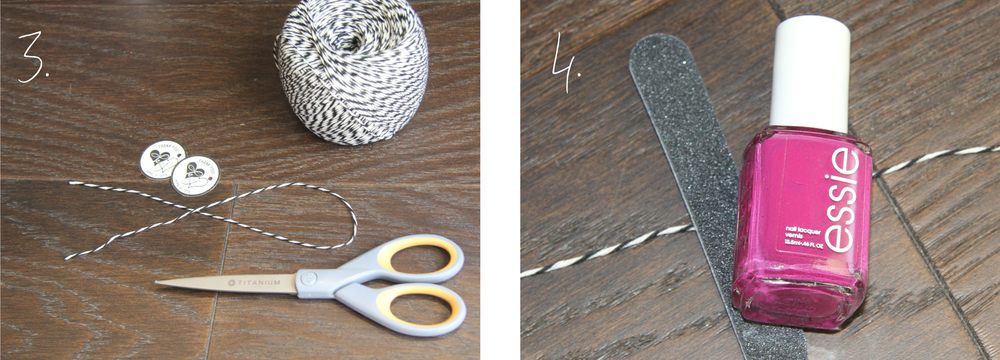
Nail Plosh Favors - Steps 3-4.jpg

Step Five: 
Place the thank you tag on one of the loose ends and tie another knot. Make sure you position the tag before you really tie it down.

Step Six: 
Trim the loose ends to the desired length. 
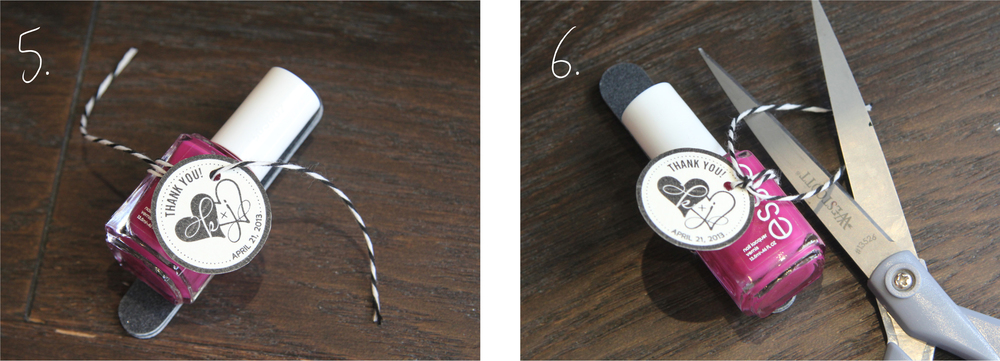
Nail Polish Favors - Steps 5-6.jpg

And that's it! Aren't they cute? And it's so easy to customize colors to match your event. 
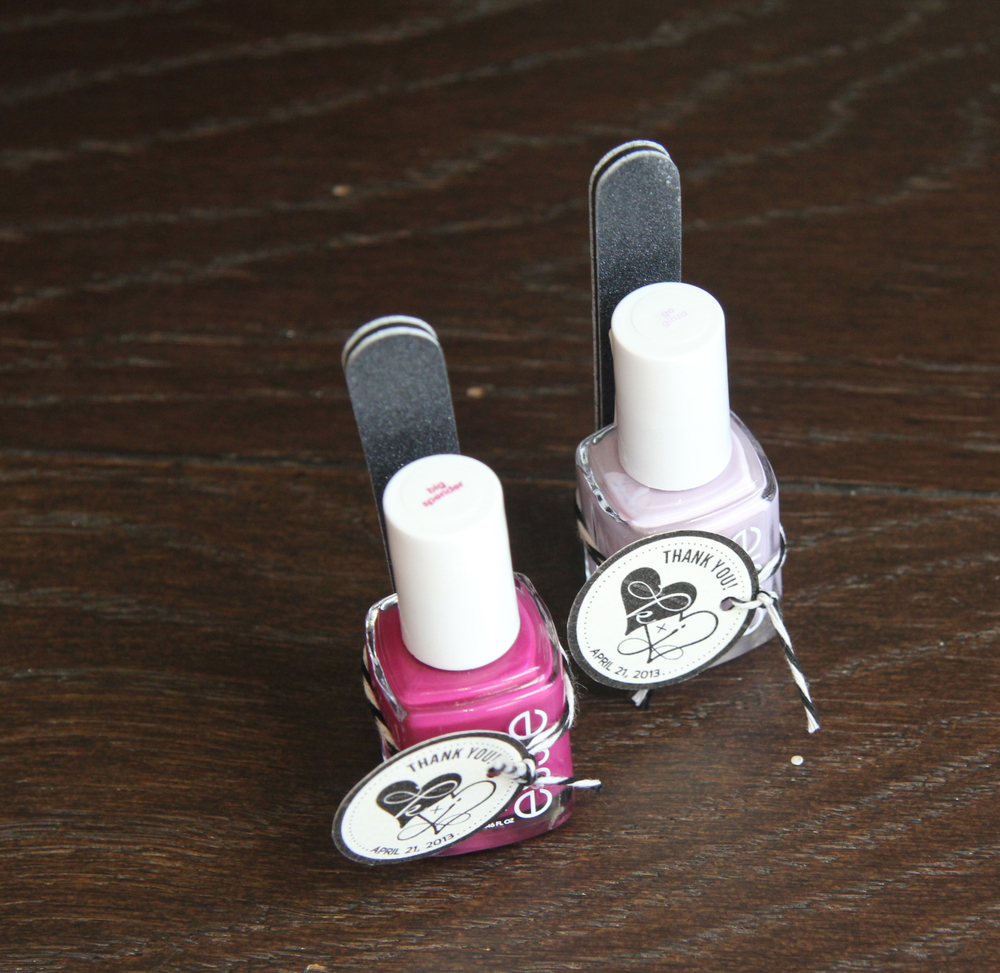
Nail Polish Favors - finished.jpg


Cocktails • Moscow Mule

So, every once in awhile I get ideas, usually creative, when I'm falling asleep. Whatever this "idea" is, no matter what, seems pretty genius in the moment of my half-asleep state and I tell myself I must remember it in the morning when I wake up. I consider getting up to write it down, you know, just to make sure, but 90% of the time I'm just way too tired for that non-sense. And then I remind myself of the other 10% of the time when i did in fact wake up to write down my genius idea, just to result in laughing at myself in the morning for it being lame. Even though I was so sure it was brilliant. Sigh. 

Anywho, this was one of those half-asleep ideas - to do a cocktail series where I could design the recipe for classic cocktails using typography which I thought represented the drink best, and then make and drink them. Because, well, duh. Seems like such a waste to go through all the work of designing a recipe to not put it to use... 

Not sure how, "genius" this idea is, but it sure sounded like fun! Don't judge me. And if you are judging a little, then you are officially invited over when I make my next one. I mean it would be selfish to keep all this fun to myself.  

So here we are. I present the Moscow Mule. I wish I had a cute copper mug to display it in like it's supposed to be, but it's delicious just the same. Also, up next will be the delicious Old Fashioned! 


Ingredients: 

1 1/2 ounces Vodka 
A splash of lime juice
A splash of simple syrup 
4 ounces ginger beer 
Lime wedge for garnish 

Directions:

Pour the vodka, lime juice, and simple syrup into a cocktail shaker filled with ice. Shake well and strain into an ice-filled glass. Top with ginger beer and garnish with a lime wedge. Enjoy!

You get cool-points if you serve it in a copper mug. 


Magazine • Wonderfully Made in His Image

We just wrapped up the March/April issue of Worship Leader. Every time a magazine gets sent off to the presses there are always the feelings of relief, exhaustion, surprise, and also utter amazement. There are times when it feels like it's can't all possibly get done in time. But, time after time, God moves, we follow, the pieces fall into place one by one, and it in the end there is a finished product. One that we hope and pray God will use to transform the lives and mission of worship leaders around the world, who will engage with God and lead their congregations in authentic worship with our heavenly Father, and among each other. This is Vertical Horizontal Worship - the focus and theme of the March/April worship. 

WL0314_cover_rgb.jpg

Vertical Horizontal Worship - you may be asking yourself "what does that even mean?" Well, in one of our featured articles by Tim Sheppard, he explains in the first paragraph, 

We are called to connect with God and to connect with people as we lead worship. The very title “worship leader” emphasizes both the vertical and horizontal dynamics of our role. We worship (vertically connect with God), and we also lead (horizontally connect with the congregation).

I think sometimes we think of worship as a private experience with God. Which it is, but we often forget it's also about our brothers and sisters around us. Worship is also a celebration of believers coming together as one body to worship our God together, and to serve and love one another outside of the musical portion of church.

Sheppard also says, "We are called as believers to build bridges by creating intersections for people to collide with God." Collide with God. Wow. 

So now that we understand what vertical horizontal worship is, I wanted to share a different article that focuses on understanding worship as a creative lifestyle, which spoke a bit more to me since I'm no worship leader nor having any musical talent whatsoever. 

This article written by songwriter and visual artist, Douglas Mann, talks about living with intention and says, 

We know and understand that we’re created in God’s image, but do we really believe that we are? What does that look like in each of our lives, and how does that play out and move forward? Implicitly, God is a creator, not a duplicator. So as our heavenly Father’s children, wonderfully made in his image, why would we not model this in our own lives by living an intentional yet creative lifestyle, which can’t be judged in a short time frame but rather becomes apparent over seasons of time?

I just really loved this - the reminder to live our lives with the true understanding and belief that we are created in God's image and to live out a creative lifestyle full of beauty, wonder, and awe. To live inspired and find joy and hope in all things and do it all with thankful hearts.

So, here's just a quick reminder to live fully. Appreciate God's blessings and beauty. Love one another and create like you are created in God's image!

About the cover: The above image is the cover for the March/April issue.  We thought it represented, as the verse says, the united body of Christ worshiping horizontally with one another, but also reaching vertically to God. The cross is also another strong symbol of vertical horizontal worship so we wanted to illustrate that with the typography. 


Save the Dates • Karianna & Scott

You know how your friends' younger siblings stay the same age forever? In your mind they are always that cute but pestering little person that always wanted to play the games you were playing, watching whatever you were watching, etc.  But then that moment - that somewhat shocking moment - comes when you realize that they have in fact aged. Gasp. And not only that, but you really weren't that much older than them to begin with. I guess adult life tends to continually bridge the age-gap.

IMG_4019.JPG

I didn't know Karianna growing up and I only met her brother in high school but she was still a couple years younger than us. So when she - and others in grades younger than us - announced she and her finance were engaged, it was a little bit of that gasp moment - but in the best way. Jon and I were so excited to hear the news and are so happy for this wonderful couple! So I was beyond honored and excited when I was asked to do the save the dates and wedding invites!

Kari knew she liked and wanted a laurel wreath of some sort with their initials inside, and also liked the idea of kraft paper. Her brother, Christian, took their gorgeous engagement pictures on the beach so we incorporated some of the design elements we talked about but decided on a two-sided approach so no writing or design would overlap and interfere with the picture. One of her wedding colors is a coral shade so we used that on the backside with a heart pattern. I always think a backside and pop of color makes invites extra special :)

Congrats Kari & Scott!  

IMG_4018.JPG
IMG_4015.JPG
IMG_4022.jpg
IMG_3993.JPG

Brand • Jeremy Armstrong {Creative Content}

In order to create a brand that truly reflects someone and  what they do, you have to somewhat know them. That's why you meet with your potential clients, correspond with them, understand what they are drawn to with examples and pins on Pinterest, etc. The great thing about creating brands for friends, is that you can often skip ahead to the creating part. This was definitely the case when creating this look for my friend (and co-worker), Jeremy. Jeremy has been the managing editor at Worship Leader for nearly a decade. I've had the pleasure of designing the magazine for the past 3 years now, so needless to say, I've learned to anticipate how he might react to a certain design or layout when I present an idea for his opinion or feedback. 

So when he said he needed a logo to help promote his side freelance venture as a content creator for other businesses and organizations, it came together pretty quickly. He knew he wanted to use a typewriter font for his name and the rest fell into place. I expanded the idea of the typewriter and ink which translated into splatters and washes to create an overall look that is classically vintage yet still clean and modern.

Here is the branding sheet! So excited to move into business cards and more with the look! Stay tuned :) 

JA-brand.jpg


Brand • Kaysen Photography

When our good friend and extremely talented photographer, Christian, first came to me to work with him on rebranding his business I was beyond honored and excited. He has very clean, minimalist, but also creative taste and vision so I knew whatever we settled on would make a statement and I think this does exactly that and then some. It's modern and clean with just the right hint of edginess. Below is just the front of the business card (photo courtesy of Christian via Instagram), his homepage, and the branding sheet. Can't wait to show the thank you cards, envelopes, stickers, and more! Check out his amazing work on his website: kaysenphoto.com. 

1524876_10202021874843065_1846412320_n.jpg
Kaysen-homepage.jpg
Kaysen-branding-sheet2.jpg